Thursday, December 27, 2012

Winter's Frosty Fun

It has been a busy week and I'm hoping all of you had a great holiday. This is a card I posted last year and it goes with the frosty fun theme:

I used the antler snowflake and the sm. snowflake and the winter stencil for this one. I started with a silver metallic card. For the background I adhered a diagonal piece of glitter paper with snowflakes on deep navy, then I stenciled the snowflakes in metallic silver paste. The word Winter is done using a double glitter technique on double sided mounting paper using smoky blue glitter for the word and Stampendous crystal glitter for the background. Next month we will have a new challenge but you still have time to go to the Dream It Up blog and enter your creation in this month's challenge. Just link your creation to the blog by using Mr. Linky or e-mail a picture to Lynell and she will put it on the blog. Looking forward to a great new year and hope to see many of you playing along with our challenges.

Thursday, December 20, 2012

Baby it's Cold Outside

Sorry this post is late but I made the mistake of sitting down when I got home from work last night and I fell asleep in the recliner. I woke up to Miss USA being crowned Miss Universe and my card not even started. yesterday my girlfriend came over and wanted to get some cards her little girl wanted me to make a special card for her mom. So we went into my craft room and selected the paper and then the stencil and then she saw my stash of glitter, she loves glitter so here is the card I came up with.
 She decided that the ice skater was the stencil she wanted to use and the turquoise paper and then she found 2 decorative papers that are from the Winter Wishes collection from echo park papers. I pasted the skater in regular embossing paste and then while she was wet sprinkled her all over with wisteria glitter by Glitter Ritz, added a few rhinestone embellishments and here is the finished product. Join us and play along with our theme of Frosty Fun , you can do this by going to the Dream It Up blog and adding you creation to Mr. Linky or you can e-mail a picture of your creation to Lynell and she will take it from there. Hope you have the best Holiday ever.

MERRY CHRISTMAS

Wednesday, December 12, 2012

Frosty Fun

For today's post I chose to showcase one of my favorite stencils, the Antelope Snowflake (LL399).
I also used the Swirl background stencil (LJ 863).
The first thing I did was pick out the notecard color I wanted to use, this is a Memory Box notecard and the color is called Thistle, the color is kind of a gray green. After choosing the color I decided on the background stencil because the swirls remind me of how snow might fall. I started by using the Tim Holtz tool with blending foam and rouging in one of his new seasonal distress inks called Iced Spruce then when I had that done I took one of my large stencil brushes and added a little of the other new distress ink call Evergreen Bough. I wanted my snowflake to have that Thistle color so I started with Regular Embossing paste and added Glacier Blue metallic F/X this colors the paste a beautiful turquoise color so then I added just a pinch if Ivy Garden metallic F/X and got just the color I was looking for. You will notice that one side of the snowflake appears lighter then the other and this is because I used a sludge technique. While the paste was still wet I sprinkled a little crystal glitter on it to give the snowflake some sizzle. When the snowflake was dry I used my large stencil brush and just brushed in a little bit of the iced spruce distress ink around the edge of the card. I backed the layered background and the image with a darker card stock and the using mounting tape popped the snowflake off the background. This is a very clean and simple card to do, my very favorite kind of card. I urge you to play with the regular embossing paste and the Metallic F/X and see what colors you can come up with. If you want us to see your creations go to the Dream It Up blog and use Mr. Linky or email a photo to Lynell and she will put it on the Dream It Up blog. I hope everyone is having a wonderful holiday season. I would like to take the time to thank all my wonderful students for your continued support of me and Dreamweaver stencils. I look forward to the New Year and the fun I know we will have.

Thursday, December 6, 2012

Frosty Fun


This months challenge is Frosty Fun. In the bay area we don't get a lot of snow but outdoor ice skating rinks have been popping up each year about this time and staying into the new year. For this card I dry embossed the ice skates stencil (LL 3016) using my Big Shot. I then used London Fog ink by Momento  to put in shading once that was done with the stencil still in place I pounced the image with stick and stamp glue by Palette, after which I sprinkled the image with crystal glitter. I layered the image on navy blue card stock to make it pop and then onto a glitter layer of blue and white polka dot and then onto a navy card. I embellished with an ivory felt snowflake. This card was fun to do and easy.  I like easy at this time of year when I've got so many things going on.  Don't forget to join us by linking your creation to Mr. Linky on the Dream It Up blog or emailing a photo to Lynell. The winner this month will get a new stencil being unveiled at CHA. Have a great week and join us here next week  for some more Frosty Fun.

Thursday, November 29, 2012

Dreamweaver CAS CHristmas

Hi Everyone it's Thursday again and It has been a crazy week at work. I didn't have time to think let alone create this week so I'm posting an older card that I have posted before. It still works for the clean and simple look. I started by taping the stencil Ornate Christmas Tree (LX 7003) to my white card stock and then pasted with Glossy Black Paste(DGKP). Remove the stencil and let it dry.  I then cut the card stock down and mounted it to a black square card, I cut a strip of silver glitter paper and mounted that to the left side of the card, I then added a bow using black tulle and a white embellishment pin (TIPW).  Come join the fun and post a creation on the Dream It Up using Mr. Linky or send a picture of your creation to Lynell and she will put it on the blog. You can win a great prize doing this. Hope everyone has a fun and creative week. Our challenge for December is Frosty Fun so start thinking about your creations for next month as well.

Thursday, November 22, 2012

Clean and Simple Christmas

Happy Thanksgiving everyone. I just realized that it is Thursday and I need to put something on my blog. the theme this month is clean and simple and I certainly know about clean and simple. My creation today uses the Sm. Snowflake (LS 26) and the Antler Snowflake (LL 399) you may notice I use these stencils quite often.
for this card I used the Molten Magic technique. First however I used the small snowflake and a lg stencil brush with Momento ink Teal Zeal and added snowflakes to the background. I then used Silver Metallic Paste to paste my snowflake. Remove the stencil and sprinkle with Metallic F/X: Sapphire, Glacier, Purple Satin and Moonstone. Heat with your heat gun. Then swiffer off the excess mica powders. I added rhinestones to the centers of each snowflake. Voila a CAS christmas card. I did this on another one of these cute Doddlebug Design cards. I hope you all take time to be grateful for all you have and the start of the Christmas Season. I am thankful for all the blessings I have been showered with and being on such a wonderful design team. I hope you take the time to visit the rest of the Dream team's blogs to see what they came up with this week.

Wednesday, November 14, 2012

Dreamweaver's Clean and Simple Christmas (CAS)

Hi all well it's Thursday again and that means inspiration from the Dream Team. I love Christmas but with my crazy schedule, if I want to get my cards out in a timely manner they had better be CAS. The card I chose to share with you falls into this category. 
 I stared by using this great card from Doodlebug design, they are the perfect start for a card. I used Stardream Ice Silver card stock for the background of my poinsettia I taped the stencil down on all four sides then pasted the Lg.Poinsettia (LG 700) with Red Glossy paste (DRGP). I removed the stencil and Sprinkled in Metallic F/X: Moonstone. The hardest part about this card is letting it dry completely before you swiffer off the excess Metallic F/X. I use the big swiffer sweeper sheets and cut them into four pieces, they really work well for picking up excess glitter and mica powders. When th image ws dry I mounted it onto a mirror silver background and the n mounted it onto the Doodlebug card. For embellishments I added some twine and a button. Easy and Fun.  Don't forget to send us your creations by using Mr. Linky on the Dream It Up! blog or send Lynell a picture using her e-mail located on the Dreamweaver website. Hope Everyone has a wonderful Thanksgiving.

Thursday, November 8, 2012

Grand Finale...Dreamweaver Stencils/Ranger Collaboration


We've now had four weeks of festively distressed fun playing with the Ranger/Tim Holtz Distress Powders along with our wonderful line of Dreamweaver Stencils and products. Huge thanks to Tim Holtz and the fab people at Ranger for sharing these four collaborative weeks with us, and providing the yummy shades of Distress Powders for us to create with. We've been inspired by the process, and we hope you have, too! 

If you haven't won one of the prize packages yet, you still have one more opportunity this week as the set below is up for grabs to a random commenter on one of the Dream Team blogs

If you've been following along each week, you've seen some gorgeous creations with these stencils and powders, so you should be all fired up to get distressed! If you've missed the first three weeks, check them out once you've made the rounds today:


My festively distressed project for this week is this:

I love the holiday season and these are two of my favorite stencils, Small Snowflake (LS 26) and the Antler Snowflake (LL399). I started my card by using white card stock and distressing the card with Tim Holtz distress inks, Bundled Sage and Spun Sugar. I then pasted the snowflakes using regular embossing paste which I then sprinkled with Worn Lipstick and Old Paper Distress Powders on the wet paste. I let this dry and then brushed the image with a fluffy brush which removed some of the particles leaving a somewhat rustic look to the snowflakes. I mounted the layer with the image onto a darker teal card stock and then onto a decorative layer. I added a tulle bow in pink and an embellishment pin that started out ivory and then I added color solution alcohol ink in Noble Fir to make it a nice teal color. This was a simple card to do and I needed to do something real simple this week because we just moved and I haven't found all of my Art supplies yet. So now it's your turn to get out there and create. 

Don't forget to leave me some love before hopping to the rest of the Dream Team blogs:


Please remember to continue to follow the team through the Dream It Up! blog as we bravely go where no stenciler has gone before, to like us on our Facebook page, and to learn from our fabulous weekly Thursday Tutorials on Paper Craft Planet as well

Wednesday, October 24, 2012

Festively Fall Dreamweaver/Ranger Collaboration Week 2


Welcome back to week two of our amazing collaboration between Ranger's Tim Holtz line of Distress Powders, and our beautifulDreamweaver Stencils & Products! If you missed last week's event, start HERE.

Last week, we were totally blown away by the awesome response we received from those of you who hopped over from Tim Holtz's blog and the Ranger blog to check us out! We've been doing the "happy dance" ever since! Hopefully, you will continue to check us out, especially over the next few weeks as we continue our play-time in Tim's sandbox. (It is rather an appropriate metaphor considering the cool texture of hisDistress Powders.)

Apparently, Tim and the wonderful people at Ranger were also excited by the response, and they've decided to "up the ante" in the form of an additional prize package(s) which will include TWELVE Distress Powders each, and a handful of Dreamweaver Stencils to go with! Wow! Just one teeny-tiny detail...to win one of these packages from their blog, you need to create something with Tim Holtz's Distress Powders and Dreamweaver Stencils and attach it to the inlinkz on the Ranger blog. Winners will be selected randomly. For more details, head over to the Ranger blog.

Once again, this week we are offering another fall prize package as shown here. Just leave us all some love as you visit, for an opportunity to be the one random winner we select. Curious as to who won from last week? It could be YOU! Visit the Dream It Up! blog for the announcement of the lucky commenter.


I decided to use the Falling Leaves stencil (LL3004) and the Molten Magic technique. Instead of using Metallic F/X mica powders I used Tim Holtz Distress Powders. The colors I used were Fired Brick, Spiced Marmalade, Mustard Seed, Shabby Shutters and Tea Dye. The effect was really pleasing to me instead of the texture having a shine to it, it was rough like sand paper and feels almost like a real leaf. To do this technique I first taped my stencil down on all four sides and then I used Dreamweaver Pearlescent Paste to paste the image. Once the image was pasted I then used a small stencil brush to pick up the Distress Powders and tapped the stencil brush with my pasting spatula. Once I had done this using all the colors I heated it with my heat gun. For my background I wanted to pull the same colors, so I taped down the Big Dot Stencil (LX7011)  and with the Tim Holtz Blending Foam and the Distress Inks in the same colors as the Distress Powders I rouged in the color and was able to achieve a beautiful blend of color. This has been a fun challenge and I hope you're playing along with us. Check out all the blogs to see what new and creative ideas the Dream Team has come up with. Well gotta go pack now, next week I will be in a new location same town, different street. See Ya All Then and until then Happy Stamping and Stenciling.

Aren't you excited to see what's next? Check out the Dream Team players for today:


You already know where to find Ranger's/Tim Holtz' products, but if you are having difficulty finding Dreamweaver, encourage your local stamp/paper-craft store to carry the line of fabulous stencil designs, pastes, and other products to mix with all of your stash of Tim's crafty goodness. You can also purchase our products on-line at Stencil with Style.

We'd love to see you come back regularly and play along with our monthly challenges (and more opportunities to win stencils) by linking your creations to the mr. linky on the Dream It Up! blog, or emailing pics of your creations to lynell@.... Since you're on the computer already, head on over and like us on Facebook as well. Just another location for dreamy and distressed inspiration!


Y

Wednesday, October 17, 2012

Festively Fall Dreamweaver/Ranger Collaboration


The Dream Team are so excited to have the opportunity to play along with some unique Ranger Products in the Tim Holtzline...specifically, the Distressed Embossing Powders! Our own Louise Healy demonstrated how fabulous these are with theDreamweaver Stencils when she created this card for a fun class at CHA Summer 2012:


Apparently, Tim Holtz agreed with all of us on this unique use of his product, so he very generously had Ranger (thanks, Patti!) send the team some samples to play and blog with. So...here we go!

Here's my post for today:


My post today features the Pumpkins stencil(LL 515). Using Double sided mounting paper and the double glitter technique. Instead of using glitter however I used Tim Holtz Distress Powders in the following colors: Mustard Seed, Dried Marigold, Spiced Marmalade, Peeled Paint, Tea Dye and Weathered Wood. I sprinkled the powders using a straw that was cut on an angle and then when all the colors were where I wanted them placed I used my heat gun on the embossing powders. I then layered the card together using card stock in beautiful fall colors and decorative paper from BoBunny design. I really love the rustic look of the Distress Powders.


For the next four weeks, on our regular Thursday posts, we will be featuring the wonderful things that you can do with Tim's Distress Powders and Dreamweaver Stencils. Leave comments on each of the team blog posts for opportunities to win one prize package for each of the four weeks:


Don't forget to play along with the Dream Team's monthly challenges for more opportunities to win some great stencil designs! October's challenge is Festively Fall, and November is CAS (clean and simple) Christmas! Link your creations on the Dream It Up! blog, or email pics tolynell@dreamweaverstencils.com. Join us on Facebook as well! Lots of inspiration, and lots of fun!

Thursday, October 4, 2012

Festively Fall -Week 1

This month's theme is Festively FAll which leaves you open to al sorts of interpretations,  What's your favorite thing about Fall? Mine is the crisp morning air, however I live in the Bay Area and we are having a mini heat wave so I guess I'll be waiting a few more days for those crisp mornings. Last week I forgot it was Thursday and forgot to post so this week I'm posting to cards. I'm using the same stencil for both, The Leaf Icons( LL471) this is one of my favorite stencils I use it a lot, it great for so many different techniques.


 The first card was done using Color Solutions Alcohol ink (pumpkin, paprika red, Creme brulee and darkest brown) on a felt pad with some thinner. I place a drop of each color on the felt applicator pad and then added a drop of thinner and pounced the color onto glossy card stock and let it dry which does not take much time. I set that aside. I stenciled the Leaf Icon onto an acetate card with glossy black paste and set Aside to dry for the rest of the night (it takes glossy paste longer to dry then the other pastes and on acetate it takes even longer , since I can't seem to keep from touching it to see if it's dry, so I put it in another room and go onto something else)


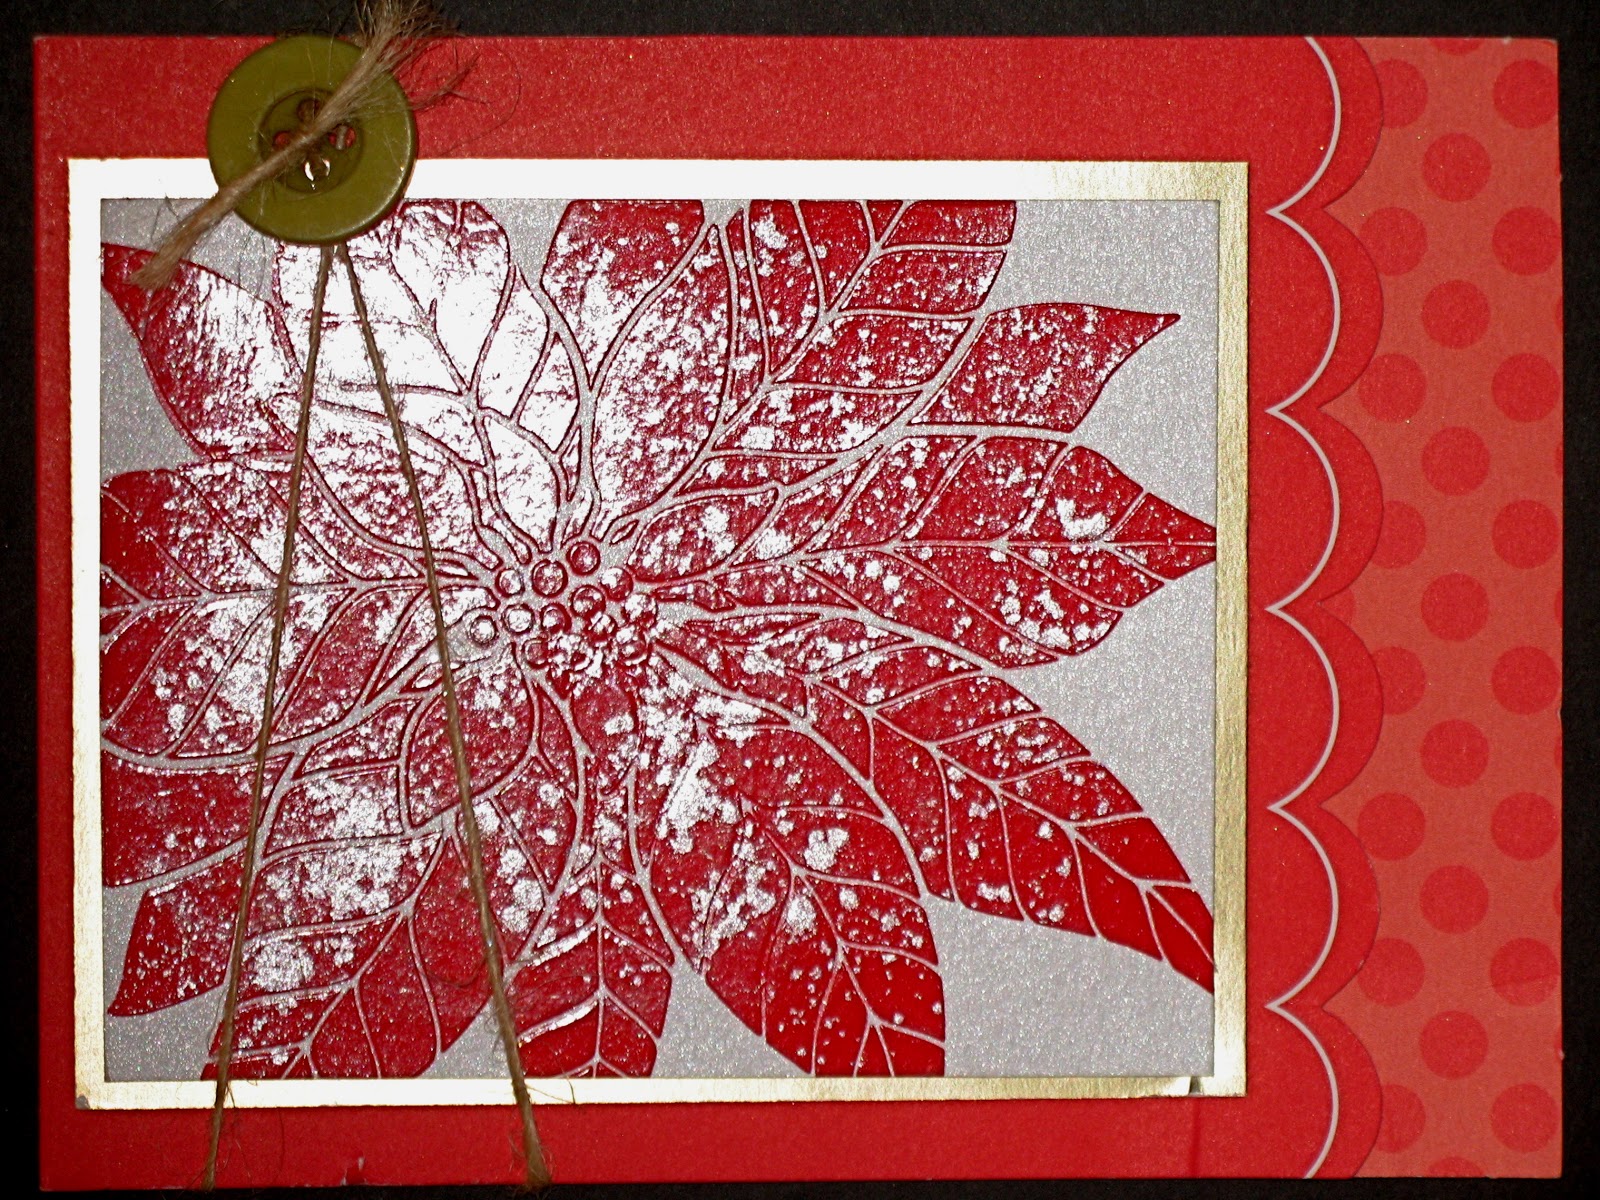
This card was done with the same Color Solutions but using a different method. I first paste embossed the Leaf Icons with gold metallic paste and let it dry. I then repositioned the stencil over the image and using a felt applicator with the alcohol inks in the same manner as above pounced over the gold metallic paste allowing a little of the paste to show through.
If you have any questions leave me a comment and I will be happy to answer your questions. Now just as last month there will be two winners of our challenge and you will get to pick a stencil of your choosing, so get to creating and link to Mr. Linky on the Dream it UP blog or e-mail a picture to lynell@dreamweaverstencil.com. 
Happy stencilling,see you next week.
ed

Wednesday, September 19, 2012

Getting INKY with Dreamweaver Stencils

Wow ... I can't believe how the year is flying by, tomorrow is the start of Fall.  Three years ago we moved into this wonderful condo, and now the landlord is returning to California and we have to say goodbye to the condo and hello to a new adventure. I truly believe that when one door closes, another door opens and this week we found a house. I have loved this house ever since I was 5 years old, a friend of mine grew up in this house. Now I will get to live in the house and I can't wait to move in.  But on to this weeks creation. With summer almost at an end, I decided to use the Ice Cream Cones stencil (LM 183). I started by picking my card, Doodlebug Designs bubblegum scalloped edge notecard. The next layer is this pretty paper from Melissa Frances called Candie. I then got some white card stock and dry embossed the ice cream cones by running it thru my Big Shot. Leaving the stencil in place I then added color by using a small stencil brush and  the following Momento ink colors: Canteloupe, Rosebud, Rich Cocoa and Peanut Brittle ( don't these sound good enough to eat). When I was finished I cut the paper down to the size I wanted and then added a layer of kraft card stock behind it. Before I put the adhesive on the layers though I decided they needed a little distressing. I distressed the white and the decorative layers with Momento Desert  Sand and the Kraft with Rich Cocoa then layered them together. My last touch was a sheer brown with white polka dots ribbon.
Now it's your turn, create something fun using Dreamweaver stencils and ink, any kind of ink and then put it on the blog using Mr. Linky. You can also send to Lynell's e-mail address on the web-site. You may be the lucky winner of a stencil of your choice. Hope to see your creations soon. 

Wednesday, September 12, 2012

Getting Inky with Dreamweaver Stencils

Wow! Another Thursday is upon us and the weeks are flying by.  I'm using a simple card this week because I'm starting to pack for our move, not sure where we will be moving to but still have to pack. This months challenge is getting inky which means you have a lot of techniques that you can use. Don't forget to play along the winner of this month's challenge will pick which ever stencil they choose.
Here's my creation for this week:

This card started with a yellow notecard. I picked a natural color card stock to do my Falling Leaves (LL 3004) I placed the stencil on my paper and taped on all four sides, then using a small stencil brush and the Circus Splendor Pad (KS10)  i rouged in yellows and oranges. I removed the stencil and sprinkled the ink with Ultra Thick Embossing Enamel, then heated with my heat gun. I replaced the stencil over the image and added some red to the leaves then after once again removing the stencil I sprinkled the image with Clear Embossing Powder (EB05) and heated with my heat gun. I distressed the edges with Adirondack Lettuce dye based ink. I cut a layer of Bo Bunny Double Dot stripe a quarter of an inch smaller then my notecard, I used the back side of the paper because I liked the design pattern. I then took my Vertical BLESS YOU stencil (LM264) and stenciled on the right side of the orange paper with Tim Holts Distress Ink - Spiced Marmalade. I layered everything together and added a sheer green ribbon.  Voila!  Simple but pretty card. 

Wednesday, September 5, 2012

Getting Inky with Dreamweaver Stencils

This months challenge is getting inky, that gives us a lot to play with. This week I got inky with the new Dreamweaver  (LL 3029)  dog stencil. First I dry embossed the dog with my Big Shot, then with a small stencil brush I rouged in color using my Momento inks: Sand, Rich Cocoa. Black and Ladybug. I used Stampendous Flocking and a Glitter pen for the ears and a black Rhinestone for the eye. I layered the image onto a piece of red card stock and then onto a Bon Bon card from Doodlebug that had been layered with this cute paper that had dog prints on it. I embellished it with a dog bone shaped paper clip.

Make sure you play along with our challenge, to do this go to the Dream It Up blog and use Mr. Linky to link your creation to the blog. You can also e-mail a photo to Lynell by going to the Dreamweaver website. Hope you have a fun filled week. See you next Thursday.

Wednesday, August 29, 2012

Christmas in August / Week 5

Wow, I can hardly believe that August is almost over and we are doing our last Christmas in August blog. For today's creation I'm using a stencil that I really love, The Swooshy X-mas Tree ( LM 279) and instead of the usual red and green I'm using the contemporary colors of Lime, Purple and Glacier. The card I'm using is one that Doodlebug Designs came out with last year called create- a -card. I love the scalloped edge and the polka dots. The decorative paper is from last year's Bo Bunny designs and I pasted the image on Bazzill's Grape Delight.
First I taped the stencil to the paper on all fours sides using removable tape, then I mixed embossing paste (DEP) with Kiwi (10) Metallic F/X. Using the Paste Spreader (LM2010) I then pasted the image, removed the tape leaving the first piece as a hinge then remove the stencil and set the image aside to dry. After the stenciled image is dry, reposition the stencil back over the image and using the Jumbo Dauber (KD02) dab glue from the Palette Stamp and Stick Glue pad (GSP) onto the image. Now you will brush on the Metallic F/X in goldfinch(05), Moonstone (04) and Kiwi (10). I then layered the card together and added Liquid Pearls - Bisque for an embellishment on the right side of the card.
You can join in the fun and link your creation to our Dream It Up blog by using Mr. Linky or go to the Dreamweaver Website and e-mail Lynell a picture of your card. 

Until next Thursday 
HAPPY STENCILING!

Friday, August 24, 2012

Blog Hop Saturday, Dreamweaver/Woodware


All of this week, the Dream Team and the Woodware UK teams are celebrating the release of the new holiday designs from Dreamweaver Stencils. Of course, no celebration is complete without prizes...and there are some fabulous ones for those commenting on both sides of the "pond". 

Each team will be providing the opportunity to win four prize packages of stencil designs, perfect for the holidays. Just leave your comments each day on each players' post as well as the Dream It Up! and Woodware UKblogs, and the Dreamweaver and Woodware Facebook pages. Two random commentors  will be chosen from the batch of weekday posts, one each from the DW and WW Facebook pages, and from the big hop on Saturday...from each side of the pond!* That's a total of eight prize packages up for grabs! Here's what you could win:

For today's post I selected the Heart Ornament stencil (LJ 921), this is a very versatile stencil as many of you who have been checking the blogs can attest. I used Memory Mists for the background, I started by spraying the stencil in a box using Green Tea (19) and Iridescent Gold (MM25) Memory Mists then taking my paper and placing it on top of the stencil and brayering. I then set the paper aside to dry. When the background was dry I placed the stencil on top and taped it on all 4 sides and then pasted the image with Dreamweaver Gold Metallic Paste (DGP). I let the paste dry and then mounted the image on black paper and then mounted that on a green card. This card was fun I love the way the Memory Mist background turned out. the fun thing about the memory mists is that no card is ever the same.


Don't forget to leave me some holiday cheer as you move on to the other players for today:

Remember to follow along with the challenges on the Dream It Up! andWoodware UK blogs for more prize opportunities, and more crafty inspiration, as well as "liking" DW and WW on Facebook.

*Winners selected must be from USA/Canada/UK only.


Thursday, August 23, 2012

Dreamweaver / Woodware Blog Hop


All of this week, the Dream Team and the Woodware UK teams are celebrating the release of the new holiday designs from Dreamweaver Stencils. Of course, no celebration is complete without prizes...and there are some fabulous ones for those commenting on both sides of the "pond". 

Each team will be providing the opportunity to win four prize packages of stencil designs, perfect for the holidays. Just leave your comments each day on each players' post as well as the Dream It Up! and Woodware UKblogs, and the Dreamweaver and Woodware Facebook pages. Two random commentors  will be chosen from the batch of weekday posts, one each from the DW and WW Facebook pages, and from the big hop on Saturday...from each side of the pond!* That's a total of eight prize packages up for grabs! Here's what you could win:


My creation for today was done with the Mittens Stencil (LJ 923), I used the Molten Magic technique. I used sapphire metallic F/X to color my pearlescent paste. I pasted the mittens and then removed the stencil and sprinkled in some moonstone Metallic F/X and then heated the paste. I used a metallic head for the center of the bow. This is a very CAS card and would be great if you have to do lots of Christmas cards.


Don't forget to leave me some holiday cheer as you move on to the other players for today:
Dream It Up! Woodware UK 
Louise Healy 
Debs Frost  
Lee Kellogg
Terrece Siddoway 
Georgia Sommers 
Pam Hornschu
Cyndi Bundy


Remember to follow along with the challenges on the Dream It Up! andWoodware UK blogs for more prize opportunities, and more crafty inspiration, as well as "liking" DW and WW on Facebook.

*Winners selected must be from USA/Canada/UK only.

Wednesday, August 22, 2012

Wednesday, August 15, 2012

Christmas in August

This week I had a great class in Berkeley at Scrapbook Territory. I actually used the stencil for this weeks card with a different look but one of my students decided she would like to use the stencil with the Molten Magic technique. Thanks Bryll I loved it so much I did one just like it  at home for my post this week.


I started with a 4 1/2 x 6 1/4 card, I used a beautiful dark green card stock. On pale green card stock I embossed LJ 922 Christmas Borders with pearlescent paste and the sprinkle in Metallic F/X in Kiwi, Goldfinch and Kimono Red. I then heated the paste with my heat gun. I love the elegant look of this card and it was so fun and easy. I added a white tulle bow and a green embellishment pin.

Want to get into the holiday spirit a little early?  Link your own Christmas in August creations to the Dream It Up! blog mr. linky, or email pics of your creations to lynell@..., for an opportunity to win this wonderful newly released Heart Ornaments:


Don't you just love this new design? There are several newly released stencils and products from CHA last month, which you can view for yourself HERE. During the week of August 20th - 25th, the Dream Team will be posting all week with a hop on Saturday to top it all...featuring all of these new fabulous designs...in collaboration with the Woodware UK team. Just a little hint...you may want to buy all of these new designs now, so you are ready and waiting for the inspiration that will come your way that week! Meanwhile, check out what the rest of the team has been creating this week: