Wednesday, October 9, 2013

Witch Crash

Check out this cute card on the Art Glitter Blog  
I love Northwoods Rubber stamps and what's more fun then coloring them with Copic Markers and adding Art Glitter for some bling.

Classes this week at Stamper's Corner

These are the the cards I will be teaching this weekend in Elk Grove near Sacramento.
The first 4 cards are Dreamweaver 
Halloween/ Autumn.


the next four cards are 
Dreamweaver 
"Something to Crow About"


Wednesday, September 11, 2013

Dreamweaver/ Art Glitter Collaboration

Having fun with this collaboration, here's the card I've done:

check out the Dream it Up blog to see what their Dream Team has come up with. Go to the Art Glitter blog to see the instructions for this card.

Monday, June 24, 2013

Happy 4th of July...Celebrate

This month Art glitter is partnering with Authentique papers. Using Art glitter with their papers really make them POP! I have really enjoyed these papers the designs are fantastique and I love the weight and texture of these papers. This card was done using the "Pride" collection. I used Dreamweaver Stencils star stencil for the tag. I used Art Glitter Ruby Red, Navy and Silver Moon microfine Glitters and Crystal Transparent glitter.
I hope you Enjoy this card.
HAPPY 4th of JULY

Thursday, May 23, 2013

The Wonderland Girls...Get Your Glitter On

These are pictures of the four cards I used for my Art Glitter blog, for the instructions on doing them go to the Art Glitter blog and take a look at what the othes have done while your there.r Glitter Girl


Sunday, April 7, 2013

Classes April 20th at Stampers's Corner

I will be teaching on April 20th at Stamper's Corner in Elk Grove, CA.  Please join us, to have a seat in this class you need to call the store and sign up: 916-686-0651. The Classes I will be teaching are Dolg Leafing using Dreamweaver Metallic Paste 
and
Faux Cros-stitch using Dreamweaver Stencils


Monday, April 1, 2013

Saturday afternoon class at Scrapbook Territory

Ok so I posted the cards for the morning class now here are the cards for the Saturday afternoon class starting at 2:30 at Scrapbook Territory:


Art Glitter

I am so excited to be picked to be on the Art Glitter design team. Looking forward to sparkling times with the team.

Saturday, March 30, 2013

Dreamweaver Class at Scrapbook Territory

I will be teaching these cards at Scrapbook Territory on April 6th from 10:30 - 1:30. 
Come and join in the fun.


Thursday, March 28, 2013

My Last Post as a Dream Team Member

Well today is my last post as a member of the Dream Team,I am moving to the teaching team, however I will still be posting samples on this blog of my upcoming classes and any projects I think you would like, so keep checking to see what I have here.  Plus I have applied to another design team and I'm just waiting to here if I made that one. In keeping with the theme of Bloomin Fresh and also my cross stitch theme here is my card for today:

For this card I used the same techniques I have used below and the stencil I used was the Bearded Iris LL516. I have had a great time with this last couple of cards and I will be teaching this series at Stamper's Corner in Elk Grove California. Dreamweaver stencils are some of my favorite tools to use for my cards and I will continue to teach them at the following stores: Scrapbook Territory (Berkeley),
Scrapbook Island (San Jose) and Stamper's Corner (Elk Grove). Now check out the rest of the dream team blogs to see what great projects they have come up with this week.

Wednesday, March 20, 2013

Bloomin Fresh week 3

The spring equinox has come and with our Dreamweaver Challenge Bloomin Fresh. I'm really loving this challenge because I have this great class coming up on Faux Cross-stitch and many of our stencils are perfect for this technique

This week I'm using the Hibiscus Trio stencil (LG 678) and the screen(CS) also from Dreamweaver to create the look of cross-stitch. I used Momento inks: Cantaloupe, Tangelo, Morocco, New Sprout and Bamboo Leaves. The card is from Doodlebug Designs and the butterfly stamp and cut-out are from The Greeting Farm. I hope you enjoy this CAS card. We still have some time left to join the challenge and win a stencil of your choice so hop on over to the Dream It Up blog and link your creation using Mr. Linky or send a picture of your creation to Lynell and she will post it for you on the blog.
Have a creative week.

Thursday, March 14, 2013

Bloomin Fresh

This is week 2 of our Bloomin Fresh challenge and I love the idea of beautiful spring flowers. I decided I would do a CAS card this week because things have been crazy in my schedule. I love the Faux Cross-stitch technique because it's simple and gives that homespun feeling.  I choose to use white card stock because the colors light up against the white. I first put my Thistle (LL 513)  stencil down and taped it on all four sides and rouged in color using a gold handled (GHB) stencil brush, I used my lightest color for this step for the flower Lulu Lavender and for the leaves Pistachio once this was done I took the tape off 3 sides and slid the screen(SC) under the stencil and rouged in my medium color, Grape Jelly and Bamboo Leaves and the added my darkest colors for shading Paris Dusk and Northern Pine. I distressed the edges with Lulu Lavender. All the inks were Momento. I then layered everything together and Voila a beautiful spring card. Now it's your turn create something with a spring theme and go to the Dream It Up blog and link it to MR. Linky if you don't have a blog you can send it to Lynell and she will get it on the blog for you. 

Have a great creative week and a HAPPY ST. PATRICK'S day !

Thursday, March 7, 2013

Fresh Blooms

Well here it is Thursday and the challenge this month is Fresh Blooms. I have been working hard the last few months getting samples ready for my classes and I have a beautiful card that I just taught. While it is not a fresh bloom it is something a fresh bloom can go into.

 This beautiful stencil (LG 626) the Large Ginger Jar has become one of my favorites,especially when I want to teach the crackle technique. I started this card by first pasting the ginger jar with Matte Black Paste I removed the stencil and let it dry.
when the image was dry I then repositioned the stencil back over the image and pasted the jar with the crackle paste ( it is essential to paste with one of the other pastes before the crackle, the crackle paste is thinner and will crackle right off the paper if you don't), I remove the stencil and let that dry. If you have a griddle or warming tray you can dry it on there in the warm setting and it will take a lot less time. 
Once the layer had crackled I one again repositioned the stencil back over the image, I added color to the vase using a large stencil brush and Adirondack LAke Mist ink. 
To get the design on the vase I then took the Dogwood Stencil (LG 668) and laid it right on top or the vase stencil and added color with small gold handled stencil brushes using Adirondack Inks Shell Pink and Cranberry  for the flowers, Momento New Sprout and Bamboo Leaves for the leaves and Rich Cocoa for the Branches. I used Momento Northern Pine to distress the edges and them layered the image onto lt pink card stock and the a soft gray card. I added a bow of Ivory Tulle and that completed the card. 
Now don't forget to play along with the Dream Team all you have to do is go to the Dream IT Up blog and use Mr. Linky or send a photo of your card to Lynell and she will post your creation on our blog.
DON'T FOGET TO SPRING FORWARD THIS SATURDAY FOR DAYLIGHT SAVINGS TIME !!!

Thursday, February 28, 2013

Fresh Start

Well,  for the last week or so it has been exciting as Chinese New Year is being celebrated. There was a Dragon parade in Berkeley the day I taught there. I decided that a card that could be used for Chinese New Year would be appropriate so here it is.

I started by using a soft gray card stock and the Chinese Lantern stencil (LL 550), I randomly rouged in Momento Gray Flannel using this stencil to create a background. Once that was finished I taped the stencil down on all four sides and pasted the lanterns with Regular Embossing Paste. I removed the stencil and let the paste dry. When the image was dry I repositioned the stencil back over the image and added color using the Splendor Pigment Ink Pad - Circus. I then removed the stencil and sprinkled Ultra Thick Embossing Enamel over the wet pigment ink and then using a heat gun melted the embossing enamel into the ink. This technique is called Faux Cloisonne. 
I urge all of you to join in the fun of creating your own fresh start or Love and Friendship card for our monthly challenge. To enter our challenge simply got to the Dream It Up blog or email a picture of your card to Lynell@dreamweaverstencils.com. You just might win a terrific prize of a Dreamweaver Product, so hurry on over before this month ends.
Have a creative week!

Wednesday, February 20, 2013

Love and Friendship

I haven't posted in two weeks because of problems with blogger, this week will not be the same I hope.

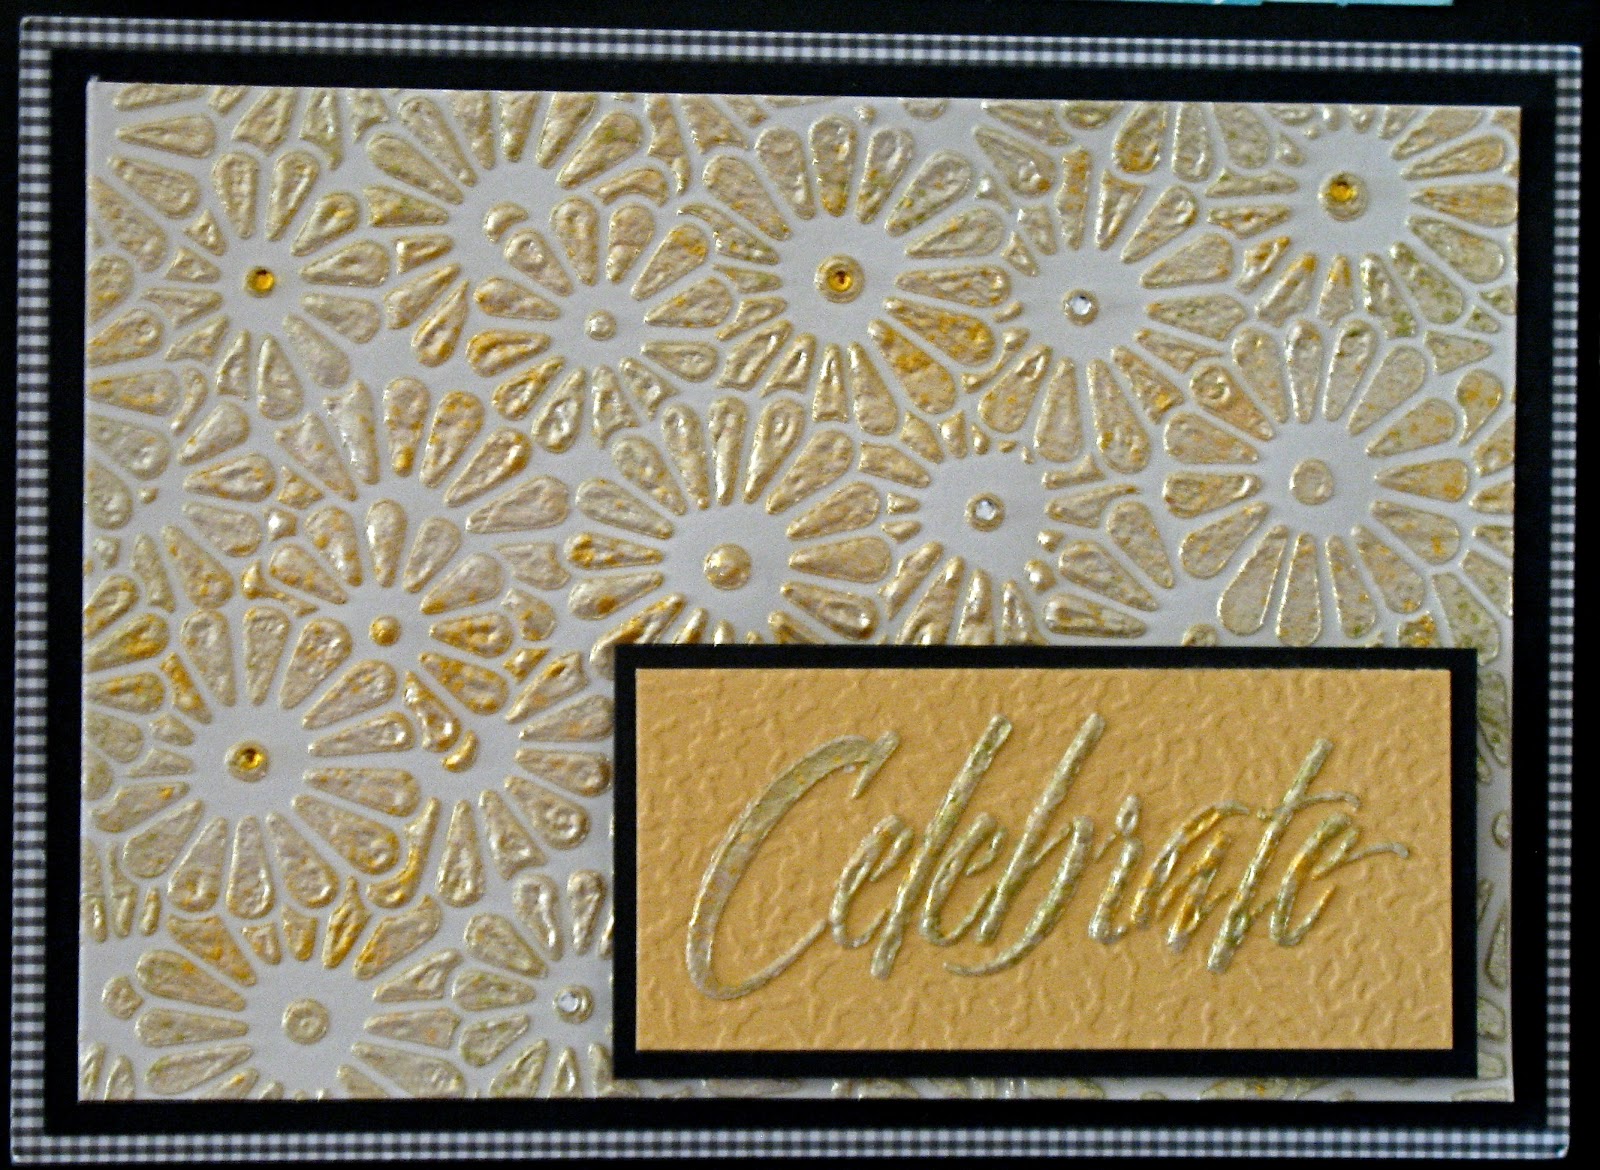
This week I am featuring a stencil that I love, the Black eyed Susan's (LJ 902). I like this stencil because you can use the whole stencil or tape off part of it and still have a great image. The technique I used here is Faux Cloisonne and I will be featuring this and several other cards in my class in Elk Grove at Stampers Corner on March 2nd. I used Regular embossing paste, and both the Circus and Magic Splendor Pigment pads. First I pasted the black eyed susan's with regular paste and then let them dry. Next retape you stencil over the dry image and add color using large and small stencil brushes, sprinkle with Ultra Thick Embossing Enamel and then heat with heat gun. This is a very CAS card and was fun to do.
Now hop on over to the Dream It up blog and show us your creation by using Mr. Linky  you could win a great prize. There are only eight more days until the design team call for 2013 ends, if you think that you might want to be on this fabulous Dream Team make sure you go to Pam's blog
the Pampered Stamper and click on the Design Team Call 2013 in the upper right hand corner for more information.
Have a great week, be CRE8TIVE


Thursday, January 31, 2013

Fresh Start

Nothing says a fresh start like making a New Year's resolution, and mine this year is to reconnect with friends who have fallen off my radar. We get so busy with our lives that some times we neglect our friends and people who mean a lot to us. This card reminds me to call or send a cards to these people.

For this card I used the new retro telephone (LM2015) and Matte Black Paste (DMBP).
As you can see this is very CAS but then I may be sending a lot of them so simple is better. 
As you may have seen last week there is a new Design Team call out so if you have question you can e-mail Pam at phornschu@yahoo.com  and she will get the information to you.

Thursday, January 24, 2013

Fresh Start


What better way to start fresh then to use a newly released stencil from Dreamweaver stencils. this stencil is call Leafless Tree (LX 7010), it is a beautiful tree with two little birds at the base of the trunk on either side that you can place in the tree. My cards is done using the double glitter technique and Art Institute Glitter I did the tree using Riverbank and Tree Bark and the sky background was done with Artic and I used Kensington from Glitter Ritz in the corners. The double glitter technique can be found on you tube. I added the little bird in the tree using glossy black paste. I can tell that this stencil is going to be one of my favorites. 
Now it's your turn to create for the chance to win some great product from Dreamweaver stencils just link your creation to Mr. Linky on the Dream It Up blog or send a picture to Lynell and she will post it on the blog for you. Don't forget the challenge this month is fresh start, which  could mean anything a new home, baby, marriage ect., so play now!

Thursday, January 10, 2013

Fresh Start


What better way to start fresh then by journaling your year. This year I made journals for some of my friends. The piece I attached to the front was done with the Butterfly stencil (LJ 916) and the Maidenhair Fern (LJ 846 ). I stencil parts of the butterfly on two corners by rouging in Bundled Sage and then I positioned the Maidenhair fern on the paper and pasted with Matte Black Paste.When the paste was dry I repositioned the stencil over the image and applied Palette Stamp and Stick Glue with a jumbo dauber. I then applied Metallic F/X in Kiwi, Ivy Garden and Goldfinch, you can do this with either a small  stencil brush of a round paint brush.  Remove the stencil and swiffer off the excess mica. Voila a fun quick gift for one of your friends.
Now it's your turn, create something with a fresh start theme and link to the Dream It Up blog using Mr. Linky or e-mail a picture to Lynell at lynell@dreamweaverstencils.com and you could be a winner in this month's challenge. While your at it check in with the rest of the Dream Team and see what they have come up with this week. 
Well off to CHA and Disneyland on friday. I am really excited to see some of my dream team sisters and find out what's new in the world of crafting. See you next week.

Thursday, January 3, 2013

A Fresh Start

 
Well 2013 is now upon us and I wish everyone a happy, healthy and prosperous New Year. Our theme for the challenge this month is Fresh Start. I'm sure like everyone else you have made some resolutions this year, and weather you stick with those resolutions or not this is the time to make a fresh start. Birthdays are fresh start to every year and I would like to take a moment to wish LYNELL a very Happy Birthday and many wonderful blessings for the new Year.  Celebrate the good things in life no matter how small or large they are.

One of my favorite techniques has become the molten Magic technique.The card shown here was done with this technique using PearlescentPaste and Goldfinch Metallic F/X.I used the Daisy Background stencil and the Celebrate stencil for this card, I use these two stencils a lot
 I hope this year you follow along with our challenges and join our challenges as well. All you have to do is make your creation and link it to Mr. Linky from the Dream It Up blog or email it to Lynell. You might be a winner so hurry now and create some thing for our monthly challenge.